|
|
|
CLICK HERE FOR INDEX PAGE |
|
RICH PICTURE V. Ryan
© 2001-2010
|
PDF FILE -
CLICK HERE FOR CLOCK RICH PICTURE EXERCISE
|
|
|
|
PDF FILE
- CLICK HERE FOR PRINTABLE TEMPLATE OF RICH PICTURE DESIGN SHEET Below is a simple diagram, with the main theme in the
centre and words linked to the theme, arranged around it. If you add
drawings/pictures to most of the words then the diagram becomes a ‘rich picture’. |
|
|
|
|

|
| |
|
|
|
|
|
|
|
A ‘Rich Picture’ is the first stage in the design
process. When you start designing, the theme is placed in the centre of the
page and link words are positioned around it. This can be seen on the
example above, a rich picture for the theme Clock Design. These link words should be related to
the centre theme and they will help you think of points that you must
consider when trying to solve the design problem.
For example, the word ‘materials’ may prompt you to consider different
woods, metals and plastics that could be useful when trying to work out the
best materials for your solution. In this way you should write as many words
as possible around the theme but only if they have some link. A rich picture
must also have pictures or diagrams to give a good, clear, visual effect.
Without them it is a diagram. |
| |
|
FURTHER INFORMATION |
| |
|
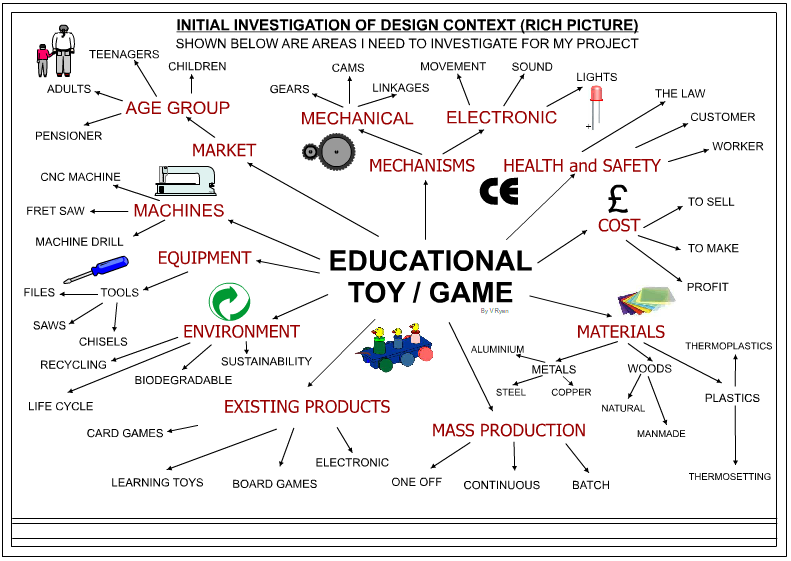
The rich picture shown below has been produced for a
project based on an educational toy / game.
1. A simple but effective border / title
block has been drawn on the paper. This must be completed first so that it
can be photocopied several times. This means that you will have several
‘blanks’ for use with following design sheets.
2. The main theme (EDUCATIONAL TOY)
is clearly displayed in the centre of the paper. You may wish to write your
theme in an imaginative style, adding appropriate shade and colour.
3. The ‘link’ words are placed around
the main theme and written accurately between very faint guidelines. The
guidelines are important as they ensure the printing is accurate and make it
easy for the examiner to read your information. If you do not use
guidelines, you may drop an examination grade for this sheet.
4. Some of the ‘link’ words also have
words arranged around them. This allows more detail to be placed on the
design sheet. Doing this may increase your grade as examiners expect to see
plenty of detail and it shows that you have thought very carefully about the
project. Look at the link word ‘materials’, this has several words arranged
around it.
5. Add pictures to many of the link
words - you do not have to add pictures for every word. The example shown
opposite has very few drawings but it gained a good grade because it is very
well presented and quality colour / shade has been added.
6. Do not overcrowd the page but at the
same time ensure that you have included plenty of detail. |
| |
|
|
| |
|
|
| |
|
SUGGESTIONS:
A. Begin by drawing / sketching a rough
version of your rich picture. This will help you plan the layout and content
of your design sheet. Do not try to complete your rich picture straightaway.
B. Do not copy ideas regarding the
layout from other pupils. This could be regarded as ‘cheating’ by the
examiner. Look at the work of other pupils and adapt rather than copy.
C. Use you imagination and be prepared
to spend time on your work.
D. Ask the teacher for advice and look
at completed projects for inspiration.
E. Complete your homework on time. Do
not fall behind as you may find it impossible to catch up. |
| |
|
ALTERNATIVE WAY OF CONSTRUCTING A RICH PICTURE |
|
|
|
CLICK HERE FOR RICH
PICTURE EXERCISE / LESSON STARTER |
| |
|
Draw a rich picture to represent a theme of your choice.
You may select a theme that relates to a design or practical project you are
currently attempting. |
|
|
|
CLICK HERE FOR DESIGN PROCESS INDEX
PAGE |
|
|
|
|
|
|
|
|
|
|