| CLICK HERE FOR INDEX PAGE |
| |
| THE PIERCING SAW (Jeweller’s Saw) |
| V.Ryan © 2019 |
| |
| PDF FILE - CLICK HERE FOR PRINTABLE WORKSHEET |
| |
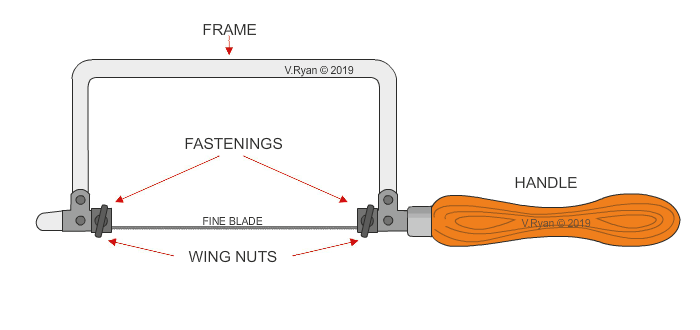
The Piercing Saw is normally used to cut and shape non-ferrous sheet metal, such as brass, copper and nickel silver. It holds a very fine blade and is capable of very accurate work, depending on the skill and experience of the user.
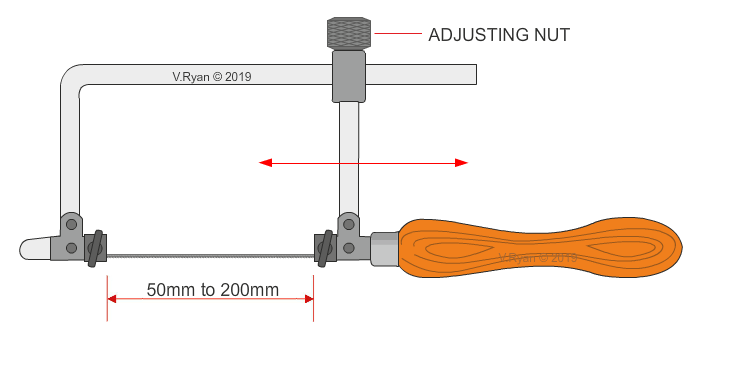
The fine blade is held in position by fastenings, at each end of the frame, tightened by wing nuts. With some piercing saws, it is possible to adjust the length of the frame, by loosening an adjusting nut, sliding the handle along the frame, followed by tightening the adjusting nut. |
| |
PIERCING SAW - EXAMPLE ONE |
 |
| |
|
|
| |
| PIERCING SAW - EXAMPLE TWO |
 |
| |
| Piercing Saw blades are very fine and are selected according to the material being cut / shaped. A common piercing blade is size 2/0 (see the table below). It should be remembered, when the blade is set up in the frame, the teeth should point towards the handle. |
| |
 |
| |
|
|
| |
| FITTING A PIERCING SAW BLADE TO THE FRAME |
| |
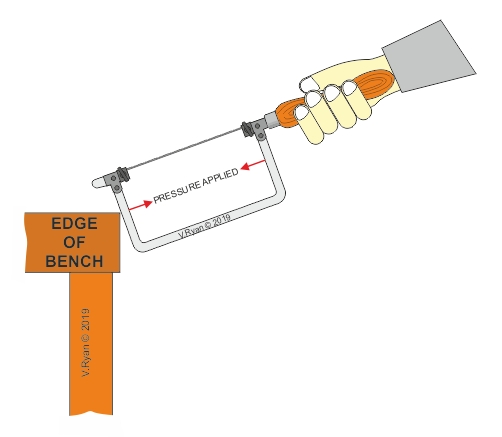
To fit a piercing saw blade, first loosen the wing nuts at each end of the frame.
Then put one end of the blade into the fastening opposite to the handle and tighten the wing nut, securing it in place.
Place the piercing saw against a bench and apply pressure, flexing the frame slightly.
Fit the opposite end of the blade into the remaining fastening and tighten the wing nut. |
| |
 |
| |
A simple test to check that the blade is set at the right tension, is to ‘pluck’ the blade. A sharp ‘ping’ should be heard, suggesting the blade is correctly tensioned. Tensioning of the blade is important, because one that is tensioned incorrectly tends to break / snap, when used to cut and shape metal.
One advantage of a piercing saw that has frame adjustment, is that a broken blade may still be useable, by simply shortening the distance between the fastenings. |
| |
|
|
| |
| HOW TO USE THE PIERCING SAW |
| |
| When using a piercing saw, sit at a comfortable height to a workbench. The sheet metal being cut, is placed on a jeweller’s bench pin (sometimes called a V-board or bird’s mouth board). The metal is held down firmly, whilst the saw is held almost vertically and sawing begins. Sawing should be even and constant, using the full length of the blade. Wiping the blade with bees wax, helps produce a smooth sawing action. If cutting round a corner or producing a curve, simply turn the work carefully, using the non-sawing hand, at the same time as sawing. |
| |
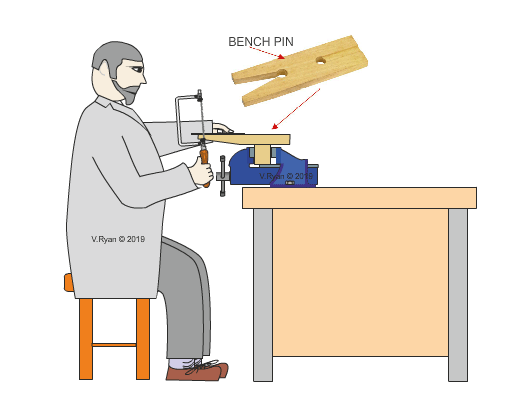 |
It is worth noting, that bench pins are available in a range of sizes and are sometimes supplied with a clamp, for clamping firmly to a bench.
The drawing opposite, shows a homemade bench pin, secured in an engineers vice. |
| |
| CLICK HERE FOR EQUIPMENT AND PROCESSES INDEX PAGE |
| |
|
| |
|