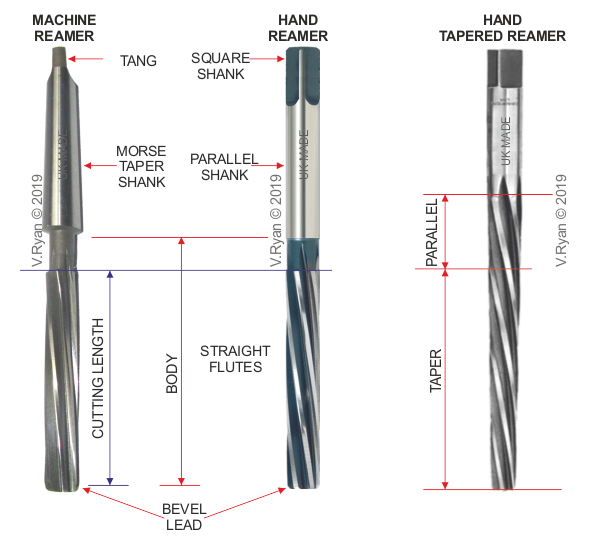
There are two main types of reamer, hand reamers and machine reamers. Hand reamers have a wrench to apply the required pressure. Hand reamers have parallel flutes. Reamers used on machines such as a lathe, have flutes that have a left-hand spiral. An interesting fact about the flutes, is that they are spaced irregularly, as this reduces the tendency of the reamer to ‘chatter’, during use.
When in use, the ‘bevel lead’ (see diagram), enters the drilled hole and pressure is slowly increased, whilst turning the reamer in a clockwise direction. This will initiate cutting. The first few turns are the most difficult, but once started, further cutting should be easy. These reamers can be used in blind holes.
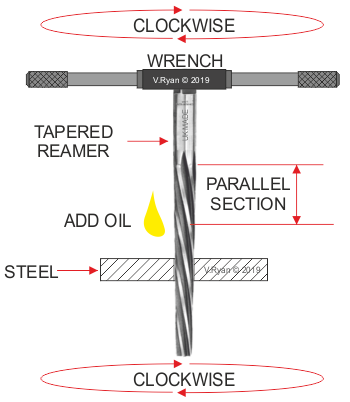
There is another common type of reamer, known as a ‘tapered reamer’. This has a taper for most of its cutting length, making it much easier to start cutting. When using this type of reamer, it must be remembered that the parallel part of the reamer extends only a short distance (see diagram below) and consequently, the reamer must be used until the parallel part of the cutter goes through the hole, being cut to size. Tapered reamers are normally used to produce ‘tapered’ holes. Please note: some tapered reamers, do not have a section which is parallel.
The square shank of a hand reamer, fits into a wrench. In this example, a tapered reamer is being used. The taper enters the drilled hole and the reamer is rotated in a clockwise direction. The spiral flutes help to feed the reamer into the hole.
It is important to keep the reamer perfectly straight, at the same time as rotating it, during the cutting process. If the reamer is not held straight, then the hole will not be straight when finished. To ensure the reamer is held straight, place it in the hole and turn it slightly with the wrench and then stop. Stand back from the work and view the reamer and wrench in relation to the work. It should be straight in the hole and square with the work.
When all checks have been carried out, the reamer is rotated in a clockwise direction, in a smooth movement, with a small amount of pressure downwards. Do not reverse the cut, as happens when tapping a hole. Oil should be added to ease the cutting. When cutting is finished, continue to rotate the reamer in a clockwise direction and at the same time, withdraw it from the work.