| CLICK HERE FOR INDEX PAGE | |
| MARKING OUT A FINGER JOINT - (PART ONE) | |
| V. Ryan © 2003 - 2008 | |
|
|
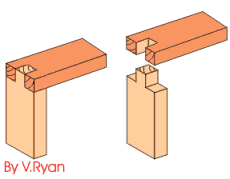
This a good example of a ‘finger’ or ‘comb’ joint. It is ideal for box constructions and is suitable for use with natural woods such as pine and mahogany or even manmade boards such as plywood and MDF. The joint is strong especially when used with a good quality glue such as PVA (woodworkers adhesive) or cascamite. The marking out and cutting procedure is outlined below. |
|
|
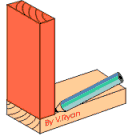
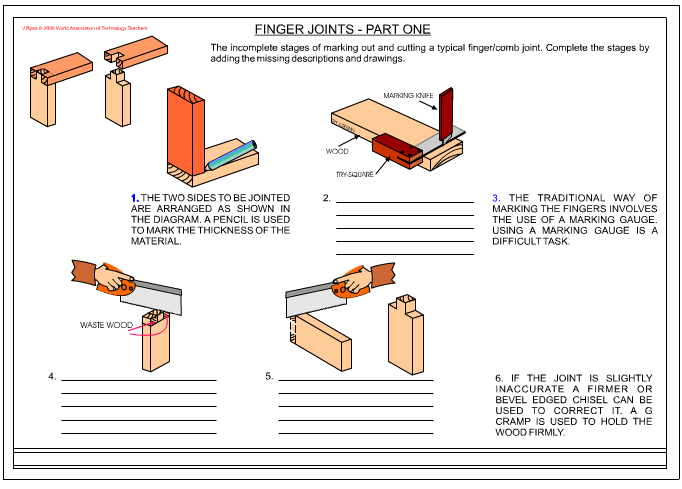
1. The two sides to be jointed are arranged as shown in the diagram. A pencil is used to mark the thickness of the material. |
|
|
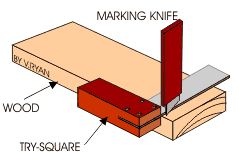
2. A marking knife and a try square are used to mark all the way round the material. It is possible to use only a pencil but a marking knife is more precise and it has the advantage of cutting the wood fibres. This means when a saw is used to cut the joint the surface of the wood is less likely to split. |
|
|
3. The fingers of the first joint are marked out using a pencil and a try square/steel ruler. The traditional way of marking the fingers involves the use of a marking gauge. Using a marking gauge to mark the fingers is difficult especially if you have not used this type of tool before. The waste wood should be shaded with a pencil. This will help you avoid cutting away the wrong part of the joint. |
|
|
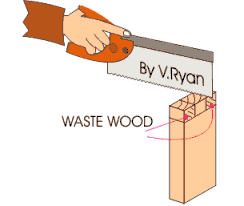
4. The wood is placed in a vice. It must be vertical so that the tenon saw is always cutting down in a straight line. Avoid putting the wood in the vice at an angle as it will be virtually impossible to use the saw accurately. When cutting it is important to cut on the waste wood side of the line. It should be possible to see the marking out lines after the saw has been used. |
|
|
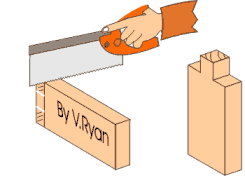
5. The wood is then turned sideways in a vice and the waste material is finally removed using a tenon saw. |
|
|
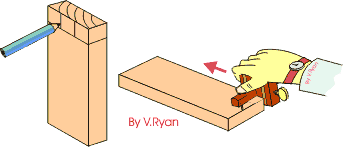
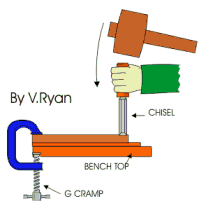
6. If the joint is slightly inaccurate a firmer or bevel edged chisel can be used to correct it. A G cramp is used to hold the wood firmly. Scrap wood is placed underneath to protect the surface of the bench from the chisel. The first side of the joint should now be complete. |
| PDF FILE - CLICK HERE FOR PRINTABLE VERSION OF EXERCISE SEEN BELOW | |
 |
|
|
|
|